Connecting to Instagram and Other Social Media in WordPress Using Advanced Custom Fields

As a web developer, it’s not a stretch to say that social media feed integration has become a de rigueur project spec for any new website I take on.
Clients realize that when done right, these feeds can increase traffic, boost revenue, and improve engagement with their brand. When working on the WordPress platform, there are many different approaches to take — some of which are more desirable than others depending on the goals of the project.
Do a quick search for WordPress Instagram plugins, and you’ll turn up 40 pages of results. Dropping in any one of these might sound like a quick and easy solution; however, most plugins try to do much more than just pull in your feed data — they also want to handle the front end. If a plugin’s provided styles don’t match up with the established design or specs for a project, then you have to hack and override the plugin, and it may end uploading in a lot of unnecessary CSS and JS on each page.
In most cases, you won’t likely need to be concerned too much with the added overhead, as proper code minification and caching will negate any real performance impact. The primary concern here is the added complexity. When a new developer contributes to the project, she will need to sort through these overrides when modifying the feed component, which adds time, complexity, and fragility to your project.
Many of these plugins also include ads and banners that try to upsell you on a pro version that allows for features such as hashtag feeds, which are already a free feature of the Instagram API and easily configurable out of the box.
Let’s take a look at an easy custom solution for a simple Instagram feed that can be applied to other social media API implementations like Facebook or Twitter, as needed.
First, we’ll set up a custom option page in the WordPress admin, where site administrators can enter their API credentials as well as a few fields to display on the front end. Then, we’ll hook up the Instagram feed to pull in some of our latest posts and customize it with our own fields and styles.
Requirements
- ACF Pro
- An Authorized Instagram API client ID
Creating a Custom Option Page
Our custom options page will appear in the back-end admin panel. This is where website administrators will be able to enter their social media API keys without needing to make any modifications in code. I’ll be using the Advanced Custom Fields plugin, which provides some built-in functionality for easily configuring custom option pages.
Below, I have defined an option page that will appear in the WordPress admin menu as “Instagram Feed”. This code can be placed in your `functions.php` file.
<?php
if( function_exists('acf_add_options_page') ) {
  acf_add_options_page(
    array(
      'page_title'  => 'Instagram Feed Settings',
      'menu_title'  => 'Instagram Feed',
      'menu_slug'   => 'instagram-feed-settings',
      'capability'  => 'edit_posts',
      'redirect'    => false
    )
  );
}
Custom Fields
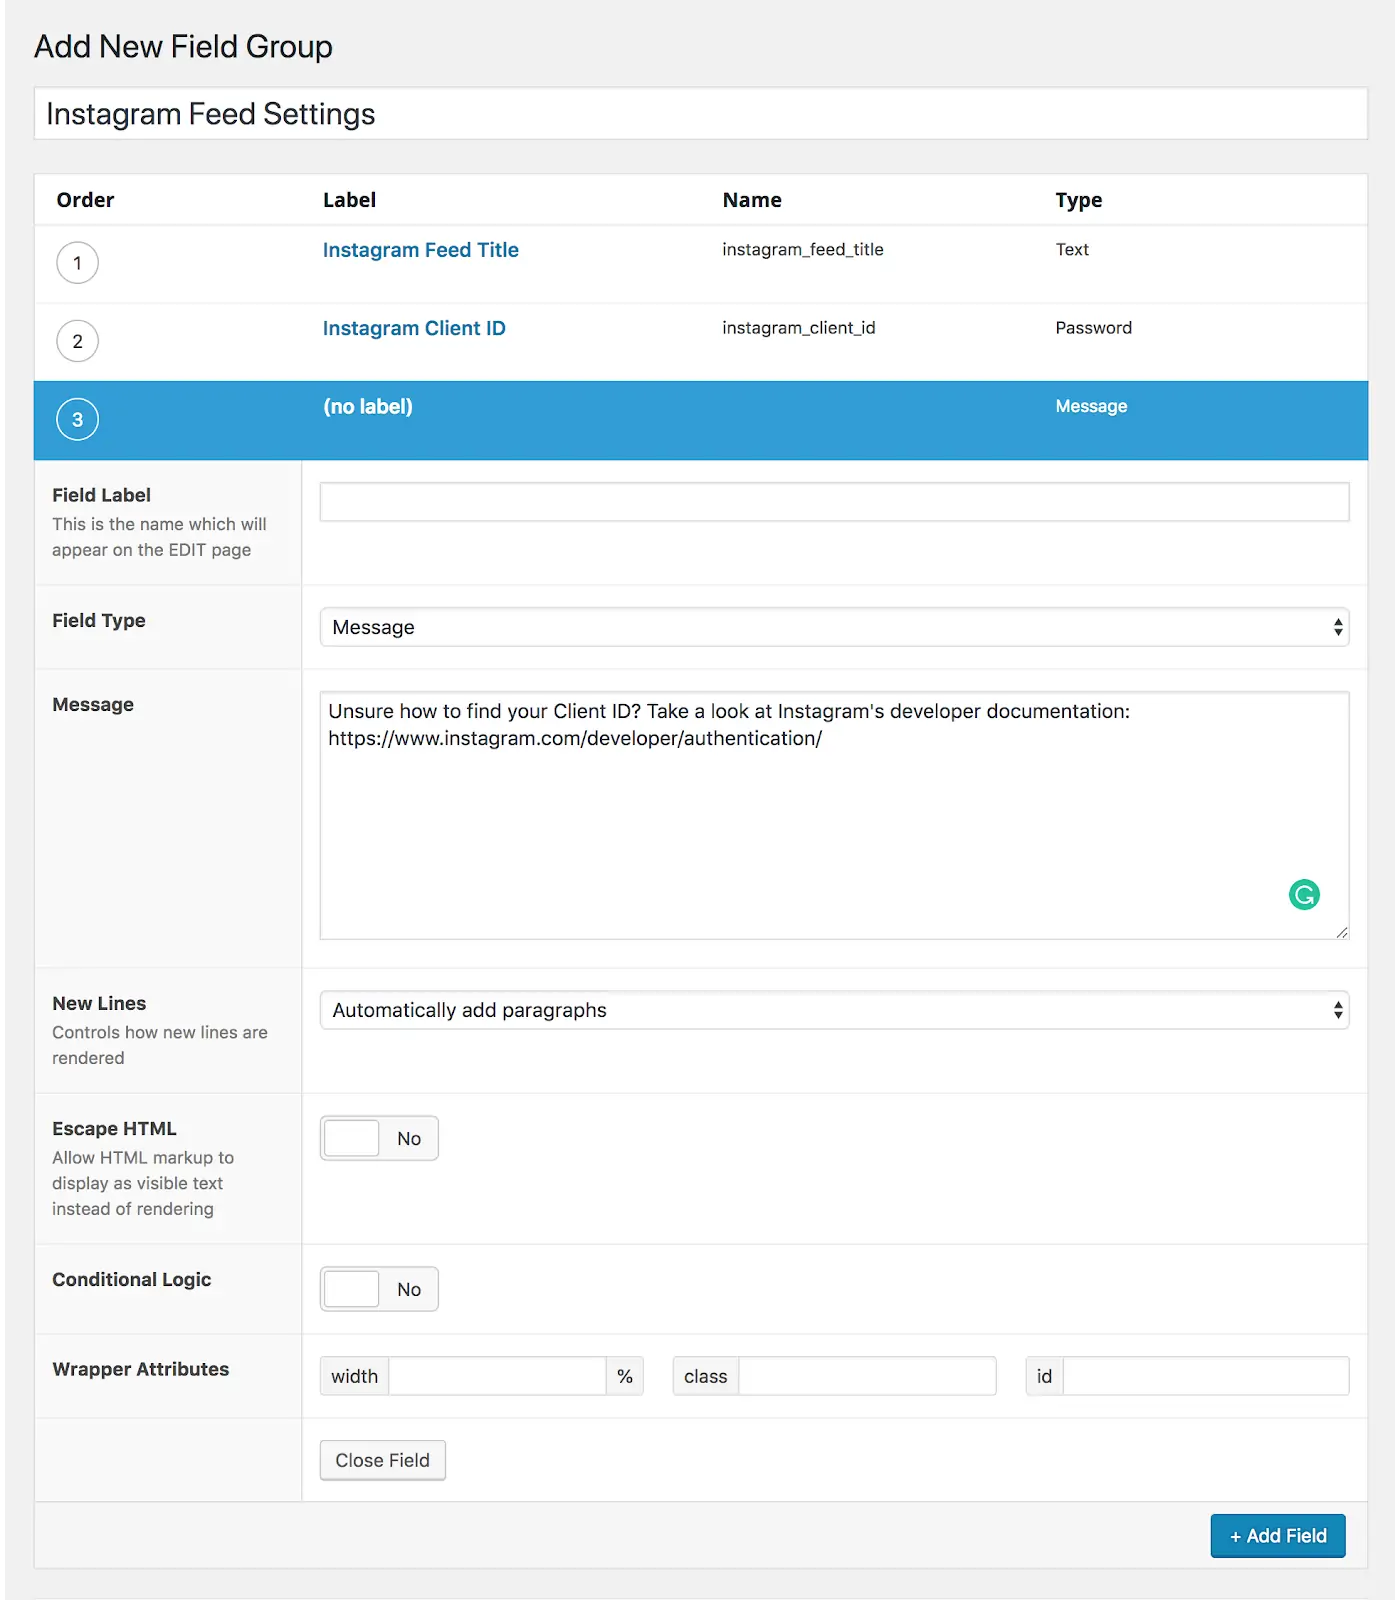
On initial setup, our option page will be completely blank, so the next step is to create a field group to display here. We’ll be adding several fields outlined below:
- A title field to display above our feed.
- An input field for the client ID – this will be a password field for added security.
- A message field including some instructional help text.
Below are the fields as I’ve defined them within the ACF field group UI:
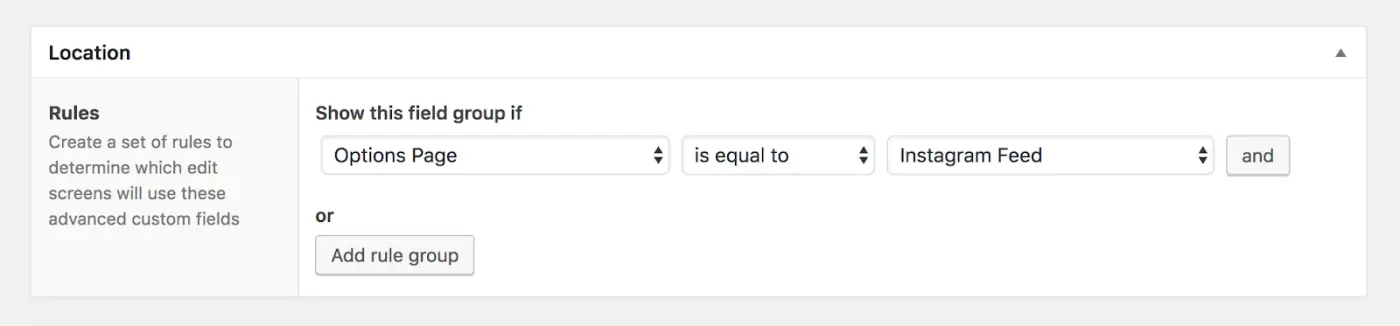
The location settings can be set to display on the options page that we previously created:
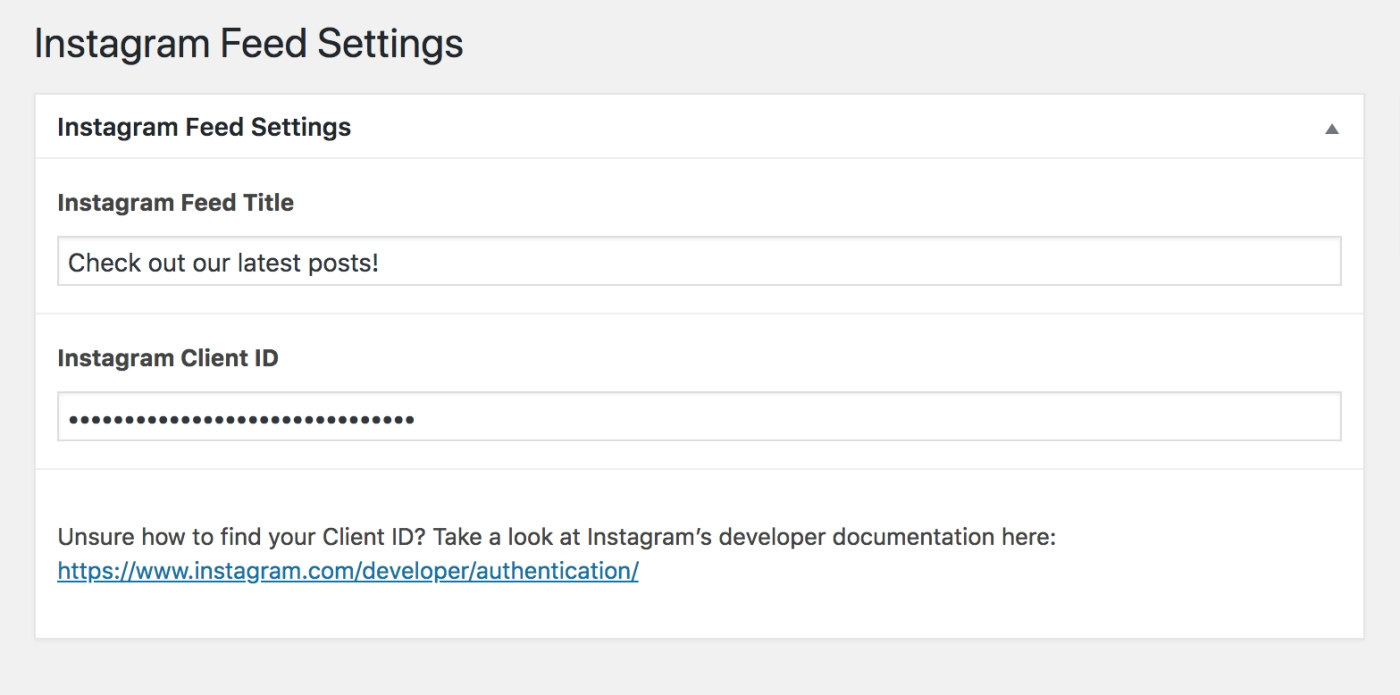
Now, we can navigate back to the custom option page and fill out the fields we created with our own content.
Displaying custom option page fields on the page template is just like displaying any other ACF field, but with the added ‘option’ parameter:

Now, let’s add some containing markup and the wrapper div where we’ll pull in the Instagram feed:

We’ll be using instafeed.js, which will allow us to access our Instagram feed by providing the client ID we previously saved to our custom meta field.
For integration with other social media services, there are similar scripts available, like the Social Feed API module with support for Facebook, Instagram, Twitter, and Google Plus.
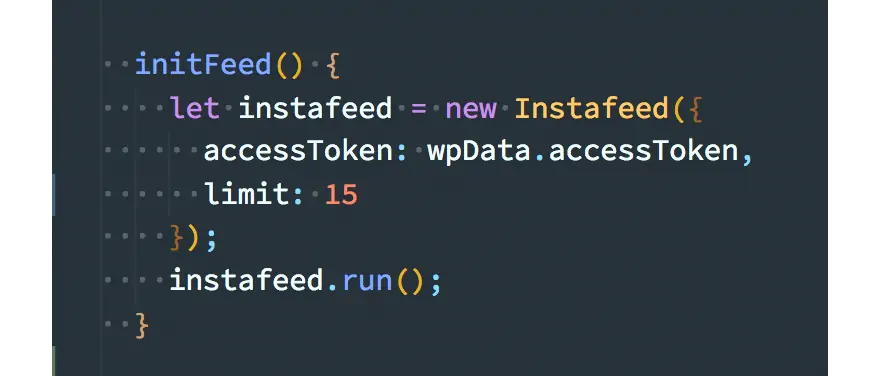
Now that we have all of the pieces in place, all we need to do is initialize the feed script.
initFeed() {
  let instafeed = new Instafeed({
    accessToken: wpData.accessToken,
    limit: 15
  });
  instafeed.run();
}
The quick and dirty approach here would be to hard-code the client ID; however, we want to make it easy for clients to modify the account information, if necessary, without needing to get into the code. They should be able to do this easily from the option page field we set up previously.
The final step is passing our meta field data from PHP to the initialization script. Fortunately, WordPress provides us with the wp_localize_script function, which does just that.
// Register your script (this is where instafeed is initialized)
wp_register_script( 'your_script_handle', 'path/to/myscript.js' );

// Localize the script with new data
$instagramToken = the_field('instagram_client_id', 'option');

$data = [
  'accessToken' => $instagramToken
];

wp_localize_script( 'your_script_handle', 'wpData', $data );

// Enqueued script with localized data.
wp_enqueue_script( 'your_script_handle' );
In the example above, we are first registering the script where instafeed.js has been initialized, then setting up the data we want to pass to that script. In this case, we are only looking to get the client ID, but we could send along any number of custom data. If, for example, instead of getting all posts, we wanted to pull in just those with a specific hashtag, we could add a field for specifying such a tag to our option page and pass it along as an additional parameter for initializing the feed.
By using this approach, you’ll have full control over the markup, scripts, and styling applied to your feed by leveraging just a few tools. The codebase is simple and easy to maintain since you aren’t overriding plugin styles, and it will also be easily managed by site administrators. Because you haven’t hard-coded anything that might be site-specific, you now have the flexibility to reuse as much of this code as needed both now and on new projects in the future.
Q&A
Why might WordPress social media plugins add unnecessary complexity?
Most plugins try to handle more than just pulling feed data, also controlling the front end with their own styles. If a plugin’s styles don’t match your design specs, you must hack and override it. New developers then need to sort through these overrides when modifying feed components, adding time, complexity, and fragility.
What are the requirements for a custom WordPress Instagram feed?
You need ACF Pro (Advanced Custom Fields) and an authorized Instagram API client ID. ACF provides built-in functionality for easily configuring custom option pages where administrators can enter API credentials and display fields without modifying code.
How do you pass API credentials from WordPress to JavaScript securely?
Use WordPress’s wp_localize_script function to pass meta field data from PHP to your initialization script. This allows clients to modify account information easily from the option page without getting into code, while keeping credentials stored securely in password fields.
What are the benefits of building custom social media integrations?
You gain full control over markup, scripts, and styling. The codebase remains simple and easy to maintain without plugin style overrides. Site administrators can easily manage it through option pages, and the code becomes reusable across projects since nothing site-specific is hard-coded.
Eastern Standard delivers expert WordPress development and design services. Our website development team builds custom WordPress solutions for enterprise organizations. Contact us about your WordPress project.